
That’s my master bedroom room wall there, and that’s my Maisie-Cat doing her best Vanna White impression to show off the wall tapestry I made from an inexpensive throw rug.
I used to have a yarn hanging I made in this spot, but then I sold it in my Etsy store, BoHoHomeBySusan, and had to come up with something new. A 2-by-3-foot area rug I saw at Target in pinks and oranges gave me the inspiration, and it cost less than $20!
The pottery on the shelves and the shelves themselves I already had displayed. Pottery items hanging ON the rug I’d saved up but hadn’t yet decided how to use. Materials I used to embellish the rug I also had, left over from other projects. So aside from the rug, the faux succulents were the only items I shelled out cash for.
Here’s the low-down on HOW…
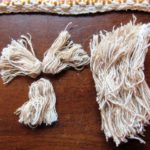
I had a BUNCH of cut fringe left over from pillow shams I originally made then deconstructed. Some of the fringe had unraveled because it had been used then ripped out. So I took advantage of the unraveled portions and fashioned them into tassels for my rug. I simply straightened the folds out and divided into similar-sized bunches for each tassel.
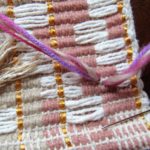
This yarn was left over from when I made the previous wall hanging, and I used it to tie off each tassel. I thread two strands of the variegated yarn through the biggest darning needle eye I had on hand and pulled a length through my rug, leaving each end even.
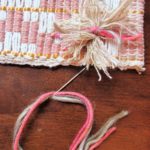
Then I knotted each tassel in the center, fluffed it up, and trimmed the yarn even with the fringe strands. The yarn gave each tassel a bit of color, while the off-white of the salvaged trim added texture.
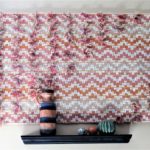
I laid in my tassels in opposing triangles on opposite corners–one large, one small. All in all, I constructed 51 tassels–45 on the left and six on the lower right. I started by making tassels all the way down the left side, then in each succeeding row I shortened it by one.
Because I ended up with nine down the left side, I made the right side with just three and decreased each row by one again.
Then I hung the rug just like the one I did for my guest room. I even had enough hanging materials left over from that project that I didn’t have to buy more!
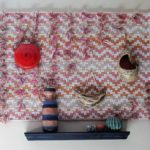
Next I arranged the hanging planters and the elements for the bottom shelf. (Elements on the side shelves did not change). They are all vintage West German pieces I’d been collecting and hadn’t decided how to use.
I liked how the look was shaping up, but something was still missing.
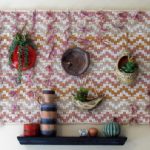
So I added in the vintage ashtray (also West German) near the center and filled my hanging planters with faux succulents.
Have I mentioned before what great collectibles midcentury modern ashtrays are? I don’t smoke–never have–but the ceramic ashtrays from this era are GORGEOUS and can often be found for not much money if you’re a savvy ebayer. I think they look terrific hung on walls, and you’ll see a couple more of them when I get around to posting some updates in my kitchen.

And if I do say so myself, this wall turned out pretty well. My cleaning lady likes it anyway, and Maisie seems to approve as well. (Maisie actually jumps at any opportunity to get her photo on social media and poses every time she sees me camera in hand.)
If you want more…

This actually concludes my promised posts on my master bedroom summer refresh–HAHA!! Glad I got it in before winter and the holidays!
But it’s just in time for you to try your hand at a similar project–maybe a gift for someone? It’s simple, easy, fun, inexpensive, and doesn’t take a LOT of time. It’s also relaxing work, something we all need around holiday time to fight off the crazies.
Happy Thanksgiving & Black Friday!
