Tuesday I posted on how my living room was progressing toward midcentury modern with a boho-chic vibe. Today I’ll cover what’s planned but not yet implemented.
Project #1: Placement of this geometric suzani textile
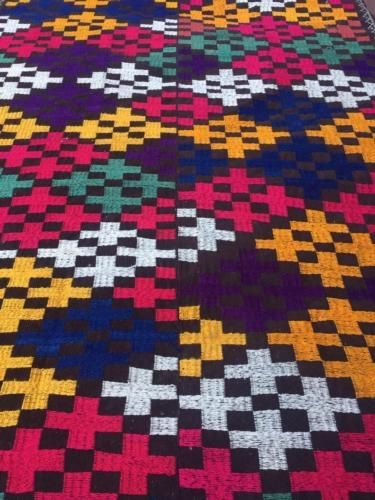
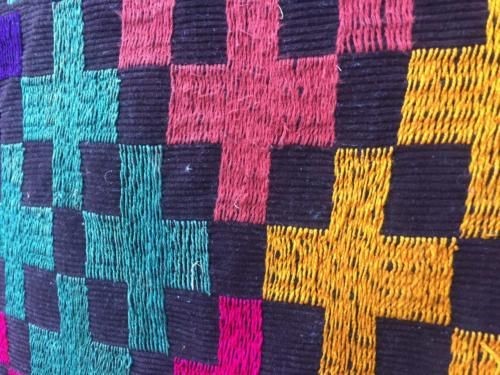
I found it on Ebay, and I’m waiting for it to arrive from Uzbekhistan, where it was made. Uzbek girls make these embroidered textiles as part of their preparation for marriage. The textiles may be used as tablecloths, wall-coverings, coverlets, and more. This particular suzani comes from Surkhandarya in southern Uzbekhistan.
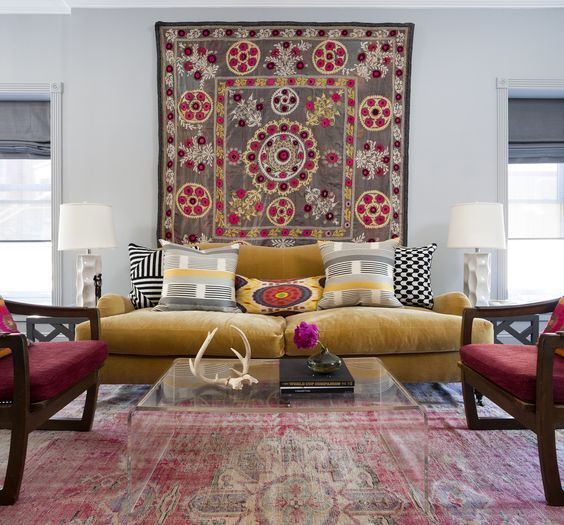
These photos of suzanis used in home decor inspired me to add one to my own living room:
 |
| Breeze Giannasio |
I love the mix of patterns and the depth the hanging suzani gives this room, which I’ve posted about before. In this example, the design is fully visible, except for the bottom border, which is hidden by the sofa back.
 |
| Houzz |
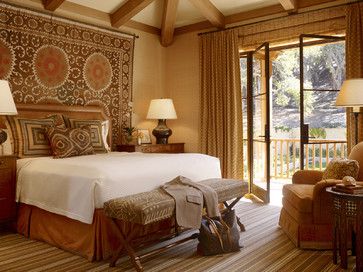
Here, more of the length disappears behind the bed, but the width extends beyond it.
 |
| Via Decor Pad |
This suzani has been framed and, perhaps, split into two pieces to make framing easier. Suzani are often embroidered in panels, then sewn together. Mine is seamed up the middle, so it could possibly be divided.
 |
| Via Inspire Bohemia |
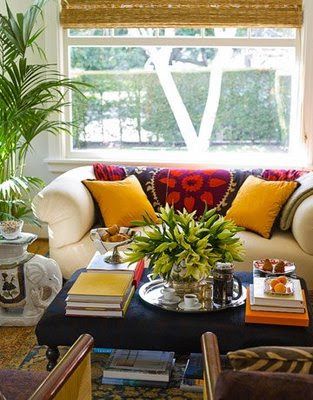
Simply draping the suzani over my sofa back (or seat) is also an option, but not my first preference.
 |
| Via Paint + Pattern |
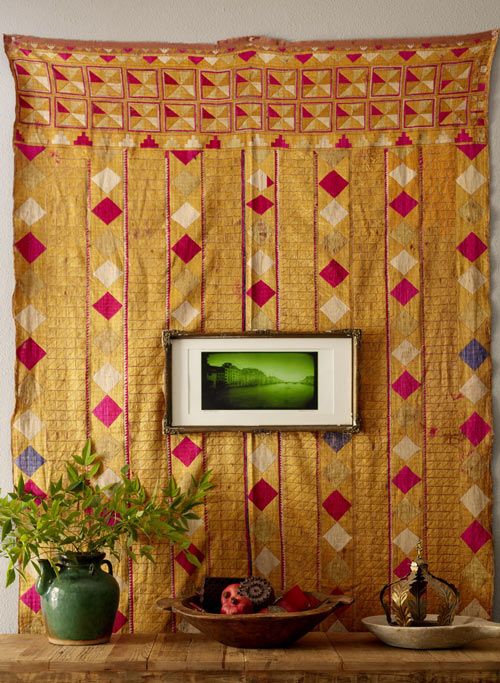
This is closer to what I want to do (though this textile is an Indian phulkari embroidery and not suzani)—hang the textile loosely, perhaps just with pushpins, then mount art on top of it.
I haven’t yet figured out how I’m going to do all this without damaging the suzani, but I’m working on it.
 |
| BoHo Home |
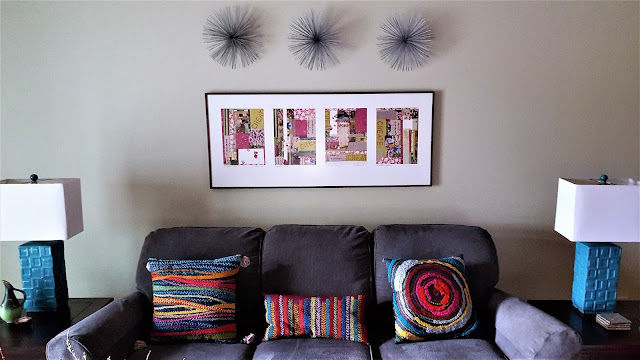
I could hang it in place of my existing over-the-sofa artwork. But I really like the artwork and the sculptural metal pieces already hanging above my sofa and don’t want to remove them. I suppose I could split the suzani, frame each half and hang one at each side.
 |
| BoHo Home |
The print is of four related collages, all incorporating the word CREATE. The magenta in the art is the reason my new magenta chair works so well in the room, which is why I don’t want to change it out. And I like the three bursts over the four panels because the 3:4 ratio is so pleasing to the eye.
 |
| BoHo Home |
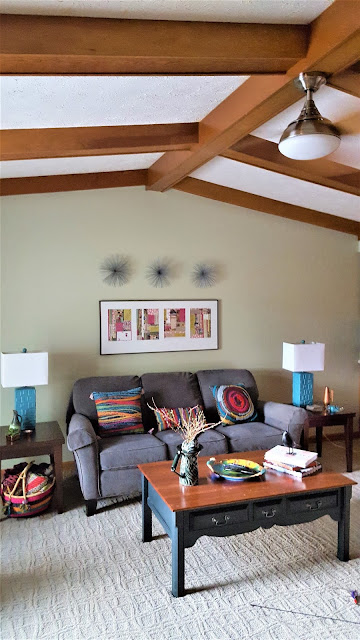
- The sofa back is 68 inches wide and the art is 48 inches. The suzani is approximately 81 by 50 inches, so I could hang it either way, thanks to the vaulted ceiling.
- Hung lengthwise it would go beyond the artwork an inch on either side.
- Hung widthwise it would extend beyond the sofa about six inches on either side.
- It’s 46 inches from the top of the burst sculptural elements over my sofa to the sofa back, which means that hung widthwise the suzani would begin two to four inches above the art.
But here’s another idea that came to me after finishing up Tuesday’s post:
In that post, I complained about the TV and media cabinet, facing the sofa, being the blah side of my living room—all function and no form—that I seldom include in photos.
Why not hang the colorful suzani on the TV wall, instead?
Not much of interest going on with this wall (below), so the suzani would liven it up, and we’d get to enjoy looking at it every time we watched our favorite shows.
 |
| BoHo Home |
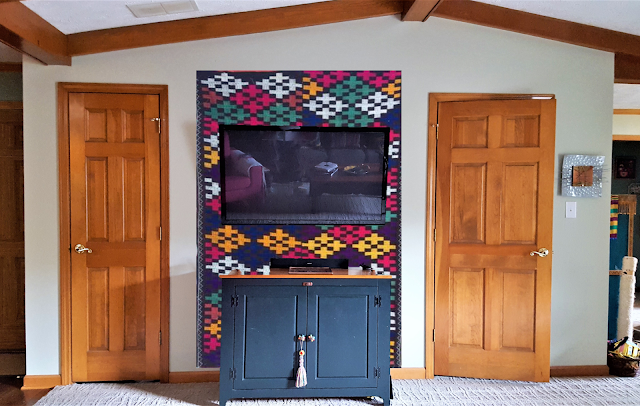
The media cabinet is 43.5 inches wide, and the space between the door moldings is 72.5. That’s not enough room to hang the textile widthwise (remember, suzani = 81 inches), but hanging it lengthwise would extend several inches on each side beyond the TV and media cabinet AND hang about even with the door tops. If I wanted, I could even extend it a bit higher, centering it approximately between ceiling and baseboard molding.
Here’s a rendering of how it will look:
 |
| BoHo Home |
Yowza! I love it! The black media cabinet really pops against the textile, which will help make up for the lack of styling on the cabinet top.
 |
| UzBek Shops / Ebay |
The other selling point for this arrangement is that since the textile is already seamed down the middle, I can open that seam just enough to allow the TV hanging bracket through, and the TV itself will conceal the opening. This is a winning solution!!
Now I just have to wait for my suzani to arrive. I purchased it the first week of March, and it’s supposed to be here no later than April 12. Customs slows everything down, but we should be in the home stretch now.
 |
| Uzbek Shops / Ebay |
You might be wondering if suzani are expensive. Like most other vintage textiles, some are and some are not, depending on age, condition, and the embroiderer’s skill. Mine, which was made in the 1980s, was sold for a flat price of $35.99 plus $30 shipping, which includes a charge the Uzbek government levies for shipping items of cultural value out of the country.
Most of these textiles have some wear-and-tear associated with them, but like with kantha quilts, that’s part of the charm. You have to examine the photos of the textiles available and decide for yourself what damage you can live with. Each suzani will have an unfinished section as well. That’s part of the tradition, since they’re presented as a marriage is beginning and the couple’s story is yet to unfold.
 |
| Uzbek Shops / Ebay |
Wheel and flower designs, like those in the inspiration photos I shared, are certainly the suzani patterns you see most, and I like those, too. But I chose this geometric because it was more in keeping with the midcentury modern vibe I wanted the room to have.
Project #2: Turning exposed kitchen cabinetry into an art installation
 |
| BoHo Home |
I like that our condo is “open concept.” It’s just that it’s a little too open in places. As you can see, the original owners were forward-thinking enough to finish off the backs of the kitchen cabinets, which face the living room, with doors that match those on the kitchen side.
This might be handy, too, since some people in our complex use this room as the dining room, and such an arrangement would allow access to tableware. Only our doors, even though they’re hinged, are screwed shut and nonfunctional.
Granted, that could be remedied. But shut tight or functioning, the real issue is I don’t like the cathedral door tops or the golden oak. If I ever get a kitchen renovation, I want these cabinets either to be open shelving or to have glass doors to help transmit light between the window in the living room and the skylight in the kitchen.
But that’s long-term. Back to now…
 |
| BoHo Home |
Previous owners installed the microwave above the stove. Mine is on the counter (left), in full view of the living room, because my husband, the gourmet cook, wanted a heavy-duty ventilation system over the range instead.
I’m not complaining, mind you. At least not much. It’s great that he cooks, and adequate range ventilation helps keep the house cleaner, as well as getting rid of cooking odors and smoke. I just wish I had a built-in microwave shelf that concealed that appliance from the living room.
What I really want is a kitchen reno, but it’s not in the budget just yet. Chris teases me that I’m hardly ever in the kitchen, so what does it matter? Problem is I can SEE it, from the living room and my study. The countertops are shot, and the cabinets, though in good condition, are dated and not efficiently arranged. Neither painting nor refacing will solve that problem.
I’ve thought about painting the lower part of the peninsula on the living room side (behind the magenta chair) to match the living room walls, but then what to do about those overhead cabinets? They are, after all, the part I hate most.
So here’s the idea I came up with for now: I’m going to turn the four square cabinet doors into an art installation.
 |
| BoHo Home |
This idea whacked me on the side of the head when I moved this print (Contour Map by Budi Kwan) from the hallway to this spot in the living room, as referenced in Tuesday’s post. I happened to notice the 12-by-12-inch framed print was about the same size as the inset panels in the cabinets over the peninsula, and the bamboo frames were about the same color as the oak. I have two more prints this size, also hanging in the hallway, and played around with the idea of hanging one centered on each door.
 |
| BoHo Home |
I didn’t want to damage the doors in case I changed my mind or we decided to move before we have the kitchen redone. Chris suggested removing the sawtooth hook from the picture-frame back so it wouldn’t scratch the cabinets. Then, since the prints themselves are mounted on Masonite board, we could glue in quarter-inch-deep wood blocks on two opposing sides to make a surface area level with the frame for mounting Command picture hanging strips.
As I said, I had two prints, but needed to buy two more.
 |
| Deny Designs |
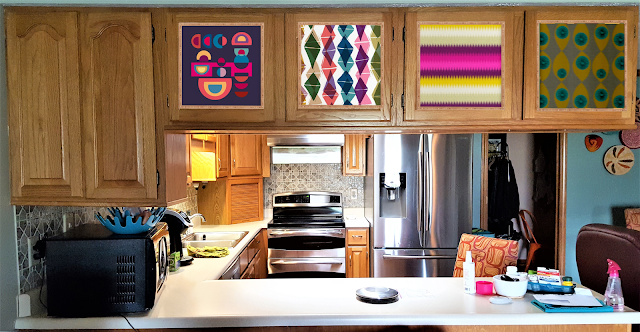
The two I already owned are shown here on the far left and right, while the two in the middle are new purchases. Left to right are: Geometric Colorplay I by Viviana Gonzalez, Collaged Diamonds by Sarah Bagshaw, and Fusion Bright Stripe by Holli Zollinger. I haven’t a name or an artist for the one on the right, though I bought all HERE.
 |
| BoHo Home |
Here’s a rendering of how the prints will look mounted. The doors are 16-inches square, and the insets are 11-inches, which means the prints will cover the cathederal topped panel and mount on the door frame.
I’ve had the prints and the ideas for several weeks now but am waiting on Chris’ tendonitis in his legs to improve so we can go buy what we need at the home store and get cracking. I admit, it looks a little busy in this shot, given the mess that has been my kitchen without Chris able to function. But the nice thing about this idea is that if I hate it, I can take it down, put the prints back up in the hallway, and live with the cabinets as is, like I’ve been doing for the past five years.
Project #3: To dip or not to dip the atomic bomb vases
 |
| BoHo Home |
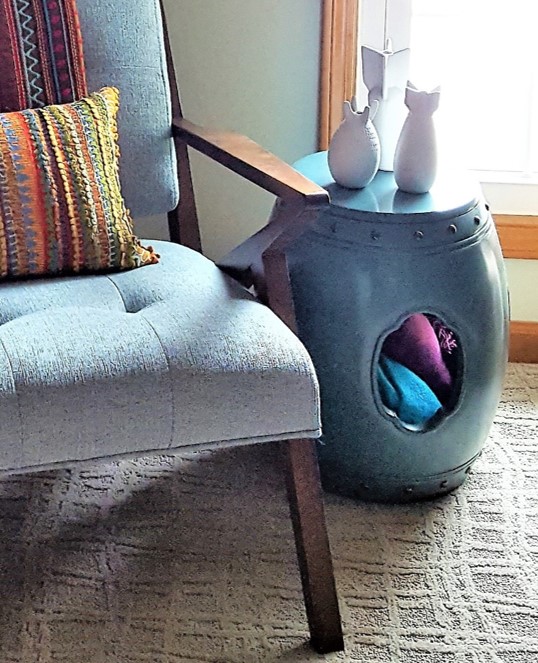
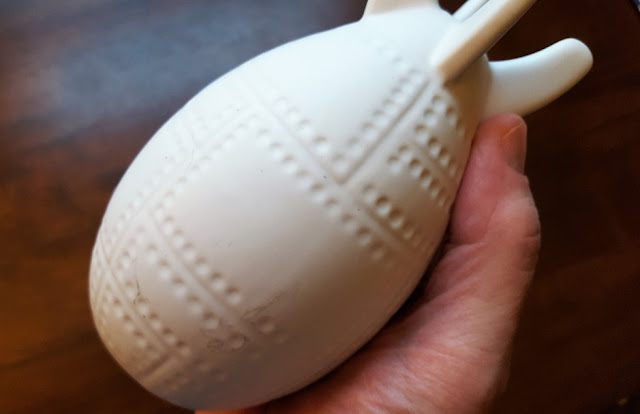
Remember those cute little atomic bomb vases sitting next to my Rocket Armchair—Thin Man, Fat Man, and Little Boy? Right now they’re all white, but I’d like to kick them up a notch.
 |
| Dina Holland / Domino |
What if they got dipped in metallic paint, like the bud vases on this mantel? But instead of gold, I was thinking…
- All copper, or
- Fat Man and Little Boy in copper and Thin Man (the prototype that didn’t work) in silver.
I was also thinking of painting each differently and perhaps at angles instead of straight around.
 |
| BoHo Home |
Two are smooth, but Fat Man has interesting textural detail that would show up better if partially painted.
Chris is concerned that if I paint them I’ll ruin them. He also mentioned the possibility they aren’t sealed and would absorb paint inconsistently. They feel sealed, though I could spray with a sealant just to be safe. And what’s the worst that could happen? That I’d need to spray-paint them white again, right?
So what would you do?
- Would you leave as is or paint?
- If you painted, would you do all in copper, or what?
- If you painted, would you straight dip, like the first inspiration photo, or angle the paint, like the second photo?
Please weigh in on this. It’s keeping me awake nights! Not really, but now that I say that, it probably will.
Project #4: More shelves and styling
I’m still piddling around with styling shelves and tabletops and will show you more as I get it how I want it.
 |
| BoHo Home |
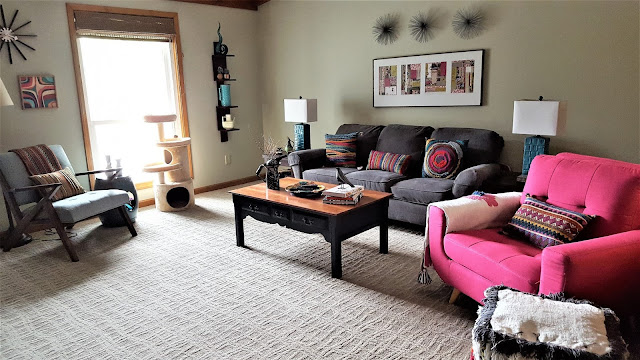
I do have dead space on either side of my sofa and wondered how adding more shelving there would look.
 |
| David Scott / HGTV |
I like the look of these shelves. Perhaps I could trade out the shelf unit I have next to the window and do shelves like this that wrap the corner? The existing shelf could move to the other side of the sofa to fill that space or be retired, since it wasn’t expensive to begin with.
Project #5: Jazz up the ceiling
 |
| BoHo Home |
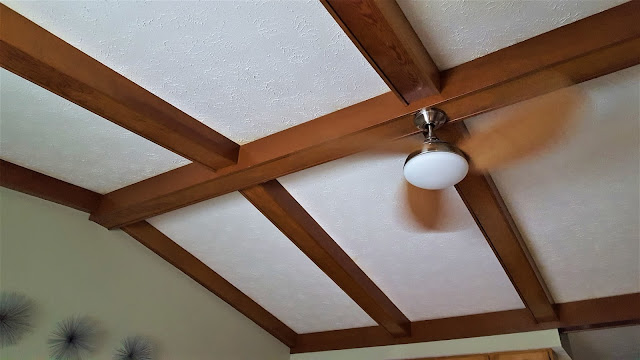
You probably caught a glimpse of the vaulted ceiling in an earlier picture, but here’s a close-up. It’s a great feature, but I think it could be even better with paint and planking between the beams.
 |
| Sharon Mimran via Cococozy |
Something like this. But should the planking go the short way, as in this photo?
 |
| Amber Interiors |
Or the long way, as in this photo?
The other option is to do the planking but leave the beam finish as is. The original beams are rough hewn timber, and the first owner had them capped with fir in a golden oak stain that matches the rest of the woodwork in the house. I like the capping better than I would rough timbers, but I’d really like to paint most or all of the woodwork in the house a creamy off-white.
We’re not blessed with a lot of light in this condo. Painting the beams would open up the space and help magnify the light coming in the living room window.
If you want more…
- Check out Part 1 of my living room refresh HERE.
- One of these days (I hope soon) I’ll get projects 1-3 (and possibly 4) completed and do reveals, so stay tuned.
- Project #5 is a long-term goal, so don’t expect anything on that for a while.
- In the meantime, I hope you’ll become a BoHo Home follower. You can get to-your-inbox posts by signing up through one of the subscription services at the bottom of this page. Or, follow my blog with Bloglovin, a social-media platform for accessing all the blogs you love in one convenient spot.
